In this post we will learn how to use the dialogue box provided by the dot net framework.
What are dialogue boxes?
When you open a word file and write some text on it and save it remember the box that appears in front of you which says SaveAs well that’s the save dialogue box, just like the save dialogue box you have some other dialogue boxes as well, try to open some previous word file of yours you see a dialogue box you select the word file and it gets opened in front of you well that’s the open dialogue box. So now in this post we will have a step by step guidance on how to open a file and save a file using the dialogue boxes and later on we will see some other dialogue boxes.
Open visual studio and create a windows based application with c sharp as the language selected give your project an appropriate name and then press ok. Now create a view which looks like the one below by dragging and dropping the tools from the tool box library
and in case you don’t see the tool box library then go to view option on the menu bar and their you will see the toolbox option.
Now the above view consists of a Rick text box and a menu strip, in order to insert the standard items of a menu like files, edit,tool, etc you can select the smart tag of the menu strip where you will see the option to insert the standard items of a menu bar see the below image for reference.
Open Dialog Box:
From the toolbox drag and drop the open dialogue box into your project from the dialogos template of the toolbox. The open dialog box will appear in the component tray see the image given below
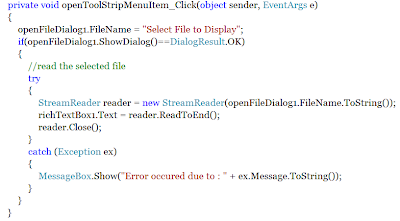
Now select the files menu from the menu strip and select the open sub menu and double click it to generate the click event so now here we will be writing a code to open a file and display it in the rick text box so let’s have a look at the code part which is given below.
Code Explanation: In the above code we open the open File dialog box with the help of the function ShowDialog of the openFileDialog class and check if the Ok button of the dialog is pressed and if it is pressed then in that case display the data of the selected file into the rich text box with the help of simple IO operation. In the IO operation I have used the StreamReader class which will take the file location to be read and display the data in the Rich text box.
If you want to specify the dialog box to open only the text files then in that case you may apply such filters to the open dialog box with the help of the filter property of the open dialog box and here’s the code to do that
openFileDialog1.Filter = "Text Files |*.txt";
Save Dialog Box:
Similarly we have the save dialog box, drag and drop the save dialog box from the dialog template into the application, the save file dialog box is same as the open file dialog box with the only one thing in difference and that’s if the open file dialog box is used to open a file then the save file dialog box is used to save a file with an appropriate name. Here's a sample code on how to use the save file dialog box
FontDialogbox:
From the name itself you can guess that this dialog box is used to set the font and again the code to display the font dialog box is same as the one for the open dialog and save dialog now lets say I want to set the font of my rich text box then to do this the code is given below I think the code is self explanatory.
Similarly their are other two dialog boxes the print dialog and the color dialog box however the implementation of the print dialog box is some what different which will be seen in the next post but the implemetation of the color dialog is the same.
I hope that this post was useful in helping you out with the dialog boxes in Dot net, any comments positive or negative are welcome as they help me to help you.


No comments:
Post a Comment